In the previous lessons we learned about the basic HTML tags. In this lesson we are actually going to get to use them to create a very bland web page. But don’t worry we are going to spice is up with CSS later. Your basic web page is going to be a simple page that is a list of all of my favorite web sites. (You can substitute with your sites if you want). This page is also going to have a few of my favorite pictures and a short description of why I like each pic. Open Visual Web Developer 2010 and open the project we created in lesson 2. If your not sure how to do this you might want to review lesson 2. Open the Default.html page you should have something that looks like the following.
<html xmlns="http://www.w3.org/1999/xhtml">
<head>
    <title></title>
</head>
<body>
    Hello World
</body>
</html>
In the <title> tag add My Favorite Stuff and remove the Hello World text from the <body> tag. <html xmlns=”http://www.w3.org/1999/xhtml”> <head> <title>My Favorite Stuff</title> </head> <body> </body> </html> Now we are going to add a list of our favorite web sites. In the <body> tag add <p>These are my favorite sites </p>. Now save the page and run your project (F5 or from the main menu Debug –> Start Debugging ) .
<html xmlns="http://www.w3.org/1999/xhtml">
<head>
    <title>My Favorite Stuff</title>
</head>
<body>
    <p>My Favorite Links</p>
</body>
</html>
You should have a very plain page with the text “My Favorite Links”. If you don’t, check to be sure that all of the HTML tags have a matching closing tag. <p> should be followed by a </p>. It is easy to forget the “/” in the closing tag. Now we are going to add a list of web sites. in the <body> tag and below the <p> tag add the following text. <ul> <li>Bing.com</li> <li>msdn.microsoft.com</li> <li>live.comm</li> </ul> Your page should look like the following:
<html xmlns="http://www.w3.org/1999/xhtml">
<head>
    <title>My Favorite Stuff</title>
</head>
<body>
    <p>My Favorite Links</p>
    <ul>
        <li>Bing.com</li>
        <li>msdn.microsoft.com</li>
        <li>live.comm</li>
    </ul>
</body>
</html>
Save the page and refresh your browser. You should see a “much improved” (I wish someone would invent sarcasm font) web page. If your not seeing a list of Microsoft site then check to make sure that you saved the page. Also make sure that you refreshed your browser (F5). If you still don’t see the correct text and you know the HTML in the page is correct (because you copied and pasted it). Then you may need to clear your browser cache. Personally, I use Google Chrome and I never have caching issues. My Favorite Links
- Bing.com
- msdn.microsoft.com
- live.com
Now we are going to link these items. Add an <a> tag to each site. <a href=”http://www.bing.com”>Bing.com</a> Your page should look like the following:
<html xmlns="http://www.w3.org/1999/xhtml">
<head>
    <title>My Favorite Stuff</title>
</head>
<body>
    <p>My Favorite Links</p>
    <ul>
        <li> <a href="http://www.bing.com">Bing.com </a> </li>
        <li> <a href="http://msdn.microsoft.com">msdn.microsoft.com</a> </li>
        <li> <a href="http://www.live.com">live.com</a> </li>
    </ul>
</body>
</html>
Save. Refresh. And your page should look like this. My Favorite Links
Cool. We now have a favorites list. Granted the page looks lame but we are going to fix that with CSS in future lessons. Now lets add some pictures and text. Before we go any farther we will want to divide our page into two sections one for the links and one for the pictures. Add <div> tags inside the <body> tags. One set of <div> tags will encapsulate the links and the other will be a place holder for the images.
<html xmlns="http://www.w3.org/1999/xhtml">
<head>
    <title>My Favorite Stuff</title>
</head>
<body>
    <div>
        <p>My Favorite Links</p>
        <ul>
            <li> <a href="http://www.bing.com">Bing.com </a> </li>
            <li> <a href="http://msdn.microsoft.com">msdn.microsoft.com</a> </li>
            <li> <a href="http://www.live.com">live.com</a> </li>
        </ul>
    </div>
    <div>
        Images go here
    </div>
</body>
</html>
Before we can add an images to our page we have to have images to be able to add. In Visual Web Developer 2010 Express right click on the solution and select “New Folder” from the pop up menu. Rename the folder images. Note: If you don’t see a “New Folder” option – from the main menu select Debug –> Stop Debugging. Then try again. 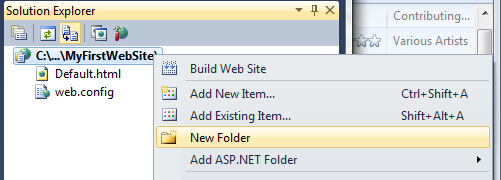 Find a few pics and copy them into the new images folder.
 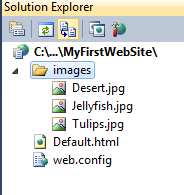 Inside the images <div> tag we are going to add a few images. Then save and runt the project (F5 or Debug –> Start Debugging).
<html xmlns="http://www.w3.org/1999/xhtml">
<head>
    <title>My Favorite Stuff</title>
</head>
<body>
    <div>
        <p>My Favorite Links</p>
        <ul>
            <li> <a href="http://www.bing.com">Bing.com </a> </li>
            <li> <a href="http://msdn.microsoft.com">msdn.microsoft.com</a> </li>
            <li> <a href="http://www.live.com">live.com</a> </li>
        </ul>
    </div>
    <div>
        <img src="images/Desert.jpg" />
        <img src="images/Jellyfish.jpg" />
        <img src="images/Tulips.jpg" />
    </div>
</body>
</html>
You should see a page with your images displayed. If you selected huge images you will want to resize them to be less than 256 pixels wide. There is nothing special about that number, we don’t want the images to take up all the space on the page. Now all that is left is to add a caption to the images. We willl use <span> tags
<html xmlns="http://www.w3.org/1999/xhtml">
<head>
    <title>My Favorite Stuff</title>
</head>
<body>
    <div>
        <p>My Favorite Links</p>
        <ul>
            <li> <a href="http://www.bing.com">Bing.com </a> </li>
            <li> <a href="http://msdn.microsoft.com">msdn.microsoft.com</a> </li>
            <li> <a href="http://www.live.com">live.com</a> </li>
        </ul>
    </div>
    <div>
        <span>desert</span>
        <img src="images/Desert.jpg" />
        <span>jellyfish</span>
        <img src="images/Jellyfish.jpg" />
        <span>tulips</span>
        <img src="images/Tulips.jpg" />
    </div>
</body>
</html>
Our page should look something close to : 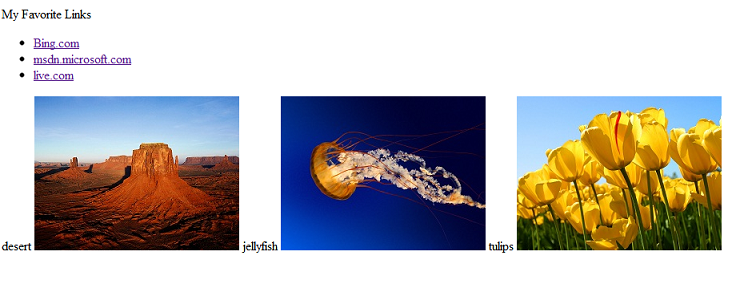 Excellent. We just created our first web page. Now it is time to make it look cool with CSS.
